This is no easy one to answer. Do you want the tufts sewn in or folded in? In a nutshell: decide how big you want the tufts, both side to side and top to bottom. Usually tufts are a little taller than they are wide. Lay this out on the foam you are tufting the fabric to and mark the location of each button. After you cut the holes in the foam, the foam needs a good solid backing to hold the buttons. Using an arch punch, or some form of hole saw, cut a hole in each button location slightly larger than the buttons you plan to use. At the outside edges of the tufted area, you need to score the foam and let the excess fabric fold into the scoring, or fold the fabric on top of the foam without scoring the foam. It is trial and error to get the right distance of the fabric between the holes in the foam in both directions. Different fabrics tuft differently, and it has to look good to you, and there is no magic formula to determine that. Once you figure this out, transfer these dimensions to your fabric, put a button through the fabric and then through the hole in the foam and through the backing material. If you use eye buttons, do not tie off the buttons too tightly at this point, (use a mattress knot) or if you're using prong buttons, bend the prongs too tightly yet. Fold in all your tufts until they are uniform and then tighten down the buttons. Sewing in the tufts is different. If that's what you want to do I'll have to take some pictures to explain it. Are you talking about using real leather? Practice A LOT with some vinyl first. Buttons are hard to make out of real leather, and a lot of vinyls. The button dies have to be set up for it. If you have more questions, just ask. Good luck.
No, not easy, but way easier than I envisioned without knowing what you wanted to do. Tufting is not hard once you have the dimensions figured out, but that can take some time. It is tedious and time consuming, though, especially a long involved piece. I did a vehicle that was a combination of a motorcycle in the front and a Volkswagen rear end. The whole inside of it was tufted.......... walls, ceiling, and part of the seats. I thought I was going to lose my mind putting in over 400 buttons.
If I were you, I would practice on a piece of vinyl that closely resembles the leather you are going to use. It's a good way to get the hang of it, and screwing up $25 worth of vinyl is no big deal compared to screwing up $300 worth of leather.
I will do a small section and take pictures so you can see what you're up against. I can't get to it for a few days, I'll try to do it by next Monday.
That's right, the holes go in the foam right where you want the buttons to be. Then you determine the spacing on the fabric by trial and error. If your holes are 4" by 6", then add the thickness of the foam to those dimensions and start there. In other words, if you have 2" thick foam add 2" to make the dimensions on the fabric 6" by 8". Every fabric tufts differently. Those dimensions may work perfectly, may need to be added to slightly, or reduced slightly. The firmness of the foam can also be a factor. If your foam is real soft, the spacing might need to be narrower. I would suggest using at least 35 to 40 compression foam to tuft, which is considered medium. The thicker the foam is the softer it can be, but I wouldn't go lower than 30 compression. Remember, a 1/4" difference in the dimensions can really make a huge difference in how your tufting looks, so take your time with your original trial and error process.
Here's some pics of the tufting process. Explanation to follow. Now remember, I threw this together in about 45 minutes this morning, so don't expect much.
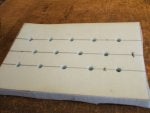
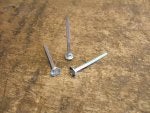
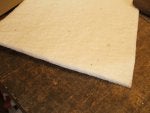
Low budget rodder: The way to do your specific seat is as follows: Determine how thick the foam padding needs to be to duplicate what's in the car now. Then you need to put the foam onto the seat and attach it so that you can take it back off without wrecking it. Once it's in the car, lay out the hole pattern you want and mark it on the foam. It is very important to do this on the seat in the car because if the seat curves backward or in any other direction, it can change the spacing of the buttons on the fabric. Cut out your holes in the foam. You can use either arch punches, or the longer silver "tool" is a piece of 3/4" electrical conduit that I ground an edge on. I like to put a layer of dacron polyester over the foam because it lets the fabric slip easier. This needs to have holes in it also. Here's where you start your trial and error. Mark diamonds on a piece of scrap fabric, and tuft a small section onto the foam. Once you have it the way you want it, take it back apart and measure the spacing side to side and top to bottom and use those dimensions to lay out the whole piece. There are two ways to terminate the tufting top, bottom, and sides. One way is to fold the fabric like I did, and lay it on top of the foam. The other way is to cut vertical and horizontal scoring lines in the foam from the top, bottom, and side button holes to the top, bottom and sides of the foam, and work the fabric into them. I used prong buttons to tuft this sample with, obviously without covering the button tops. Another option is threaded nails which attach by sliding a metal washer down the shaft until the button is tight. Another option is to use eye buttons and tie the buttns off with a mattress (figure 8) knot. The good news is that all your tufting can be done out of the car once you have fitted the foam to the seat.
the rest of the pics. You can see where I marked the pattern on the back of the vinyl, and then pushed a sharp point through the fabric to mark the fabric on the front side. This also makes pushing the buttons through the vinyl easier. Start tufting from the center row and work out to the ends. Then work up and down from the center out. Don't tighten the buttons down as tight as they'll go at first. Adjust the tufts and then tighten the buttons all the way. Like I said, this was done hurriedly, and could have been tweeked to let the fabric lay better, but you should get the idea.
I forgot to mention when I updated the posts that you need a solid backing to attach the buttons to. This can be cardboard strips, wood, heavy synthetic backing, a combination of the strips and backing material,whatever, but if the backing is weak, the tufts have no depth and look bad. I use a fabric called Versare to cover the back springs which makes an excellent backing, or I have also used Flex Pad, which is used more for seat springs than back springs. The first pic is Versare, which comes in 40" wide rolls. The second pic is the Flex Pad, which is made to be a padding over seat spring construction and comes in 20" and 24" wide rolls.
Also: I went back and edited my answer to Alan's question. Go back and take a look.
They are the same. You need to figure out how far apart the holes in the fabric are and you'll be all set. One tip for you...don't tighten down the buttons right away, leave them a little loose in the beginning to help with the fine tuning. Once the fabric is just so, then tighten them down all the way.
Yes, it's the exact same process, only it's easier with a piece of furniture. However, this should probably not be your first attempt at upholstery, tufting takes practice to have it come out correctly.
The only way the old covering would be of use to you is if you use exactly the same kind of leather, and exactly the same kind of filling. Leather, if it is soft and supple, would actually be to your advantage. The older leather was a lot stiffer than it is now days. It's a lot simpler to do now days having a nice consistent piece of foam to go over.
The depth of the tufts is only dependent on the thickness of the foam you use and how tight you pull the button strings.
Trust me when I tell you that tufting is immensely easier using foam for the base. I would use 2 1/2" or 3" thick foam in the firmer range from 45 to 65. Then what you have to do is cut the foam to the size of the piece you're working on and mark out the hole pattern you decide to use on the foam.
The basic concept of tufting is that there is a mathematical correlation between the holes in the foam and where the buttons go through the leather. The correlation is based on two factors, the thickness of the foam and the spacing of the holes in the foam. Where the buttons go through the leather would be larger than the holes in the foam and deck pad. That correlation stays the same for the entire piece, it never changes. You don't tuft the piece right to the furniture frame, you would tuft the leather through the foam and attach it to a deck pad that has the same hole spacing marked on it as the foam. That whole assembly would then go over the springs. You don't attach that deck pad, foam, leather assembly to the furniture until after it has been tufted. This way you can do your tufting on a flat surface instead of right to the furniture.
The old leather will not do you any good unless you can duplicate the tufting exactly as it was done in the first place, including the filling. Because this would be next to impossible, it would be easier to start from scratch. What would happen is that you would try to duplicate it and then have to do it over and over and still probably not have it come out right.
There is no way to find a hide that is as long and as wide as you need. That in itself is not an easy proposition. In order to tuft a large piece, two or more pieces of leather would have to be cut in a zig zag pattern and then sewn together. The seams would be hidden by the folds in the tufts.
Now you're getting it, all except this part....The hole spacing is what is different, not the hole size. The hole spacing for the fabric (in this case leather) has to be bigger than the hole spacing on the foam (these holes are where the buttons are going to be) and the deck pad to account for the depth of the holes as well as the folds in the fabric. In other words, if the hole spacing for the foam is 6" tall and 5" wide, the spacing on the fabric needs to be say 9" tall and 8" wide depending on the thickness of the foam you use. The fabric has to not only span the 6" and 5" distances horizontally, it has to also go down a certain distance into the foam. This extra fabric needs to be folded under accordingly and is what makes the tufts. Also, the holes in the foam need to be about 3/4" to accept the buttons and the surrounding leather more readily.
I don't know what to tell you about the suppliers of foam, leather, and buttons. Most upholsterers make their own buttons, which should be size 22, by the way, which is a little bigger than 1/2" in diameter. I would suggest finding a local upholstery shop to make the buttons and get all the other supplies you'll need. Leather can be bought on line at a lot of different places. Just search for leather and don't be surprised at how much this will cost. If you can do what you want to do for under $1000 I will be very surprised. To cut down some of the cost, have the buttons made from a matching vinyl. Making leather covered buttons is very difficult because of the thickness of the leather, and you'll be charged accordingly if you can even find someone to make that many leather covered buttons for you. I know I wouldn't do it for any price.
Just tighten the buttons down slightly to hold them in place at first, and then start to tighten them down completely in stages, a little tighter at a time. As you do this, you will be able to tell exactly how tight to pull them by the way the tufting looks. It also would be easier to use prong style buttons than eye style buttons. I'll post some pictures of the difference tomorrow and tell you why the prongs are easier.
Buttons are made in three parts. A small piece of fabric cut in a circle, a shell, and a back. The back can be a nail, an eye, a threaded nail, or a prong. There are other kinds of backs, but these are the most common ones. Tufting can be done with any of these backs depending on where the tufting is going. For example, if you were to tuft the headboard of a bed, you might want to use a nail button and just pound the nails into the headboard. Eye buttons are the most used type of button, but if you've ever pulled 100 button strings tight and tied them off with a mattress knot you can't imagine how sore your hands will get. That leaves the other two alternatives, the threaded nail and the prong. My personal preference for tufting is the threaded nail held in place with a spring washer, but the spring washers are getting hard to find. The last alternative is the prong button which is shown in the middle of the picture with the red head on it. The round thing in the front is a spring washer, and the button on the left is a nail button with a spring washer attached. The other part in the picture is the round button shell. The sleigh was tufted with eye buttons through a piece of 1/4" plywood shaped to fit the sleigh back. (Santa was really happy with the sleigh, BTW) Threaded nails are as long as a prong buttons and have a shaft that has threads on it. The shaft is not as thick as the nail button. With a threaded nail, you push the button through and slip on a spring washer. You don't have to tighten the tuft by pushing the washer all the way on until the very end of the tufting process. With the prong button, you simply push the button through and bend out the prongs in different directions. There again, you can bend the prongs in the middle instead of all the way up by the button head before the final tufting process. Both the threaded nails and prongs come in a variety of lengths depending on how thick the foam is that you're using.
From the pictures you posted before, I would say the diamonds are 4 1/2" by 3". So.........if the pattern on the fabric is say 7" by 5 1/2" you have to cut the zig zag pattern those dimensions plus 1/2" seam allowance on both sides of the cut.
Look at the pictures. If the layout on the leather is 7" tall by 5 1/2" wide, the black dots on the cardboard represent those dimensions and are where the buttons go. The left side is how the fabric needs to be cut on the left half of the leather being sewed together. The right side is how the right half of the leather needs to be cut so that when they are sewed together, the two pieces interlock. When the final piece is tufted, the stitch lines will be hidden under the folds of the tufts.
There is another way to do it that involves sewing all the tufts in place and leaving small pockets where the buttons go.
No, you don't need to trim the extra leather off the seams, the folds will hide the seam, and the seam will sink into the foam.
I use a product called Flex Pad to go over springs, but I have not seen it available anywhere other than one of my local suppliers. If you want some, just let me know how much you need in a PM and I will send it to you.
Status
Not open for further replies.
You have insufficient privileges to reply here.
Related Threads
?
?
?
?
?
Hot Rod Forum
2.2M posts
176.8K members
Since 2001
A forum community dedicated to hot rod owners and enthusiasts. Come join the discussion about restoration, builds, performance, modifications, classifieds, troubleshooting, maintenance, and more!