Hey Levi, my standard answer when dealing with ANYTHING is TRUST NOBODY. I'm reading more and more horror stories as suppliers increasingly use offshore facilities, so TRUST NOBODY.
First, get the pistons you will use. Take the pistons, rods and the block to the machine shop and tell them to bore the block to fit the pistons with whatever piston to wall clearance that's recommended by the piston manufacturer. Have them assemble the pistons to your rods. Pick up the block and pistons/rods from the shop and take them home.
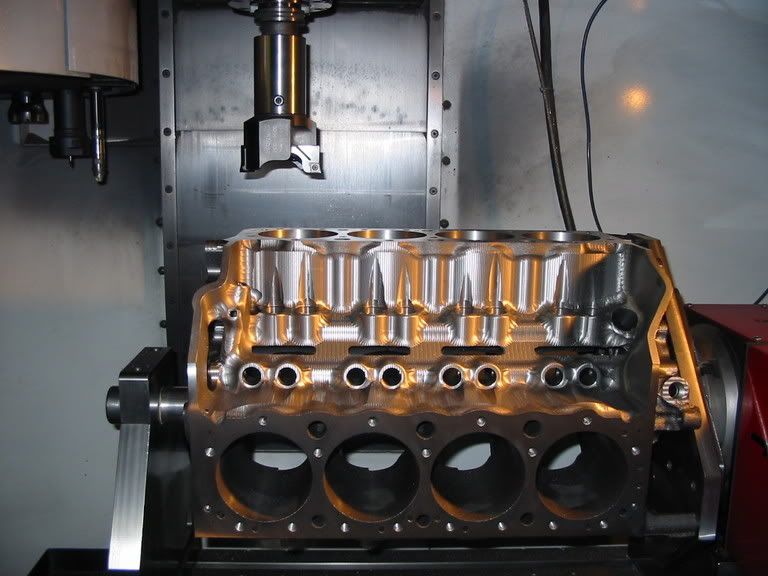
Mount the block on an engine stand. Remove the main caps and clean out all machining debris from the main saddle and from the cylinder bores at cylinder numbers 1, 2, 7 and 8 (the four corners of the block). Place main bearings at the #1 and #4 main bearing positions. Oil the bearings. Place the crankshaft into position and snug down the main bearing caps on these two positions. You do not need to torque them, just snug them down. Now, we have the crank in place and are able to rotate it. I don't use #5 position because it is harder to get the bearing into and out of position. #1 and #4 will work just fine.
Choose any one piston/rod assembly. We are going to use only ONE to do the measuring at all four corners of the block, therefore eliminating any variances between all of the piston/rod assemblies. Note very carefully that there is a large fillet side and a small fillet side on the big end of the rod. The large fillet must be placed on the side of the rod journal that is next to the counterweight. Placing the small fillet side of the rod against the corner of the fillet at the counterweight can result in interference, even though we are going to use only one rod on the journal in this exercise.
This may sound confusing to you, but you will get the idea as you go along. On #1 cylinder, for instance, the large fillet of the rod will be facing forward. On #2 cylinder, for instance, the large fillet of the rod will be facing rearward. Don't worry about whether the piston is facing forward or backward. It will not matter.
Turn the block on the engine stand so that the #1 cylinder is straight up and down and the block deck is flat and level.
Remove the rod cap. Install bearing halves in the rod and cap and oil them. Install plastic protective covers on the rod bolts to prevent nicking the crank journal as you install the piston in the bore. Turn the crank so that the #1 rod journal is at the bottom of its stroke. Install the piston (less rings). Snug the rod cap. You don't need to torque the cap, just snug it up.
You will need a good steel rule or straightedge and a set of feeler gauges. As you stand at the side of the block, you are going to span the rule across the cylinder bore at either the 3:00 O'Clock or 9:00 O'Clock positions of the piston and about 1/4" from the edge of the bore. If you try to measure at the 12:00 O'Clock or 6:00 O'Clock positions, the piston can tilt back and forth on its wrist pin and give you erroneous measurements.
Stand the rule on its edge and bring the piston up to what you perceive to be TDC. Insert different feeler gauge blades between the piston crown and the bottom of the rule until you get a snug fit. Have a buddy there with you so he can move the crank through the top dead center position of the piston back and forth (bringing the piston down in the bore maybe a 1/4" and back to TDC each way clockwise and counterclockwise of the crank while you hold the rule and blade in position to make sure you have nailed the measurement). You will need to hold the rule down pretty good to make sure the piston isn't pushing it up. The narrowest measurement you can record will be the piston deck height for that cylinder. De-grease the block deck there and record the measurement on the deck right next to the cylinder with a black, indelible Sharpie felt tip pen.
Remove the rod nuts and remove the piston/rod assembly. Re-install the plastic boots and move on to cylinder #7 to repeat the procedure. Then turn the block on the stand so that cylinders #2 and #8 are straight up with the block deck flat and repeat the procedure.
When you are through, you will know the piston deck height of each cylinder exactly. Don't be surprised to find that the decks are sloped one way or the other and that you have different measurements from one end of the block to the other. It is commonplace to miss clearing away a chip in the machine at the factory from the previous operation, so that everything the machine operator does after that will be skewed. That's what we're trying to correct here. You can return the block to the machine shop to be decked with the confidence that any further machine work will be accomplished from a good base of information. TRUST NOBODY.
By the way, this is a good chance for you to do some teaching to your buddies. I doubt that any of them have ever done this exercise, so it would be a good learning experience and add to your credibility at the same time. Invite a crowd. :thumbup: Tell them the cost of the education is to bring a six-pack.

One last thought. When you get the short block all assembled, you might want to check all 8 pistons again with the rule and feeler gauge at the 3:00 O'Clock and 9:00 O'Clock positions on each piston. A difference in the dimension from one side of the piston to the other could indicate a bent rod. It could also, of course, mean that the piston isn't machined square, but the pistons are usually pretty close.
Depends on the shop. $100 to $200. Whatever it costs, it's worth it.
Make sure the shop is using quality equipment and registers the block off the main saddle to do the decking.